
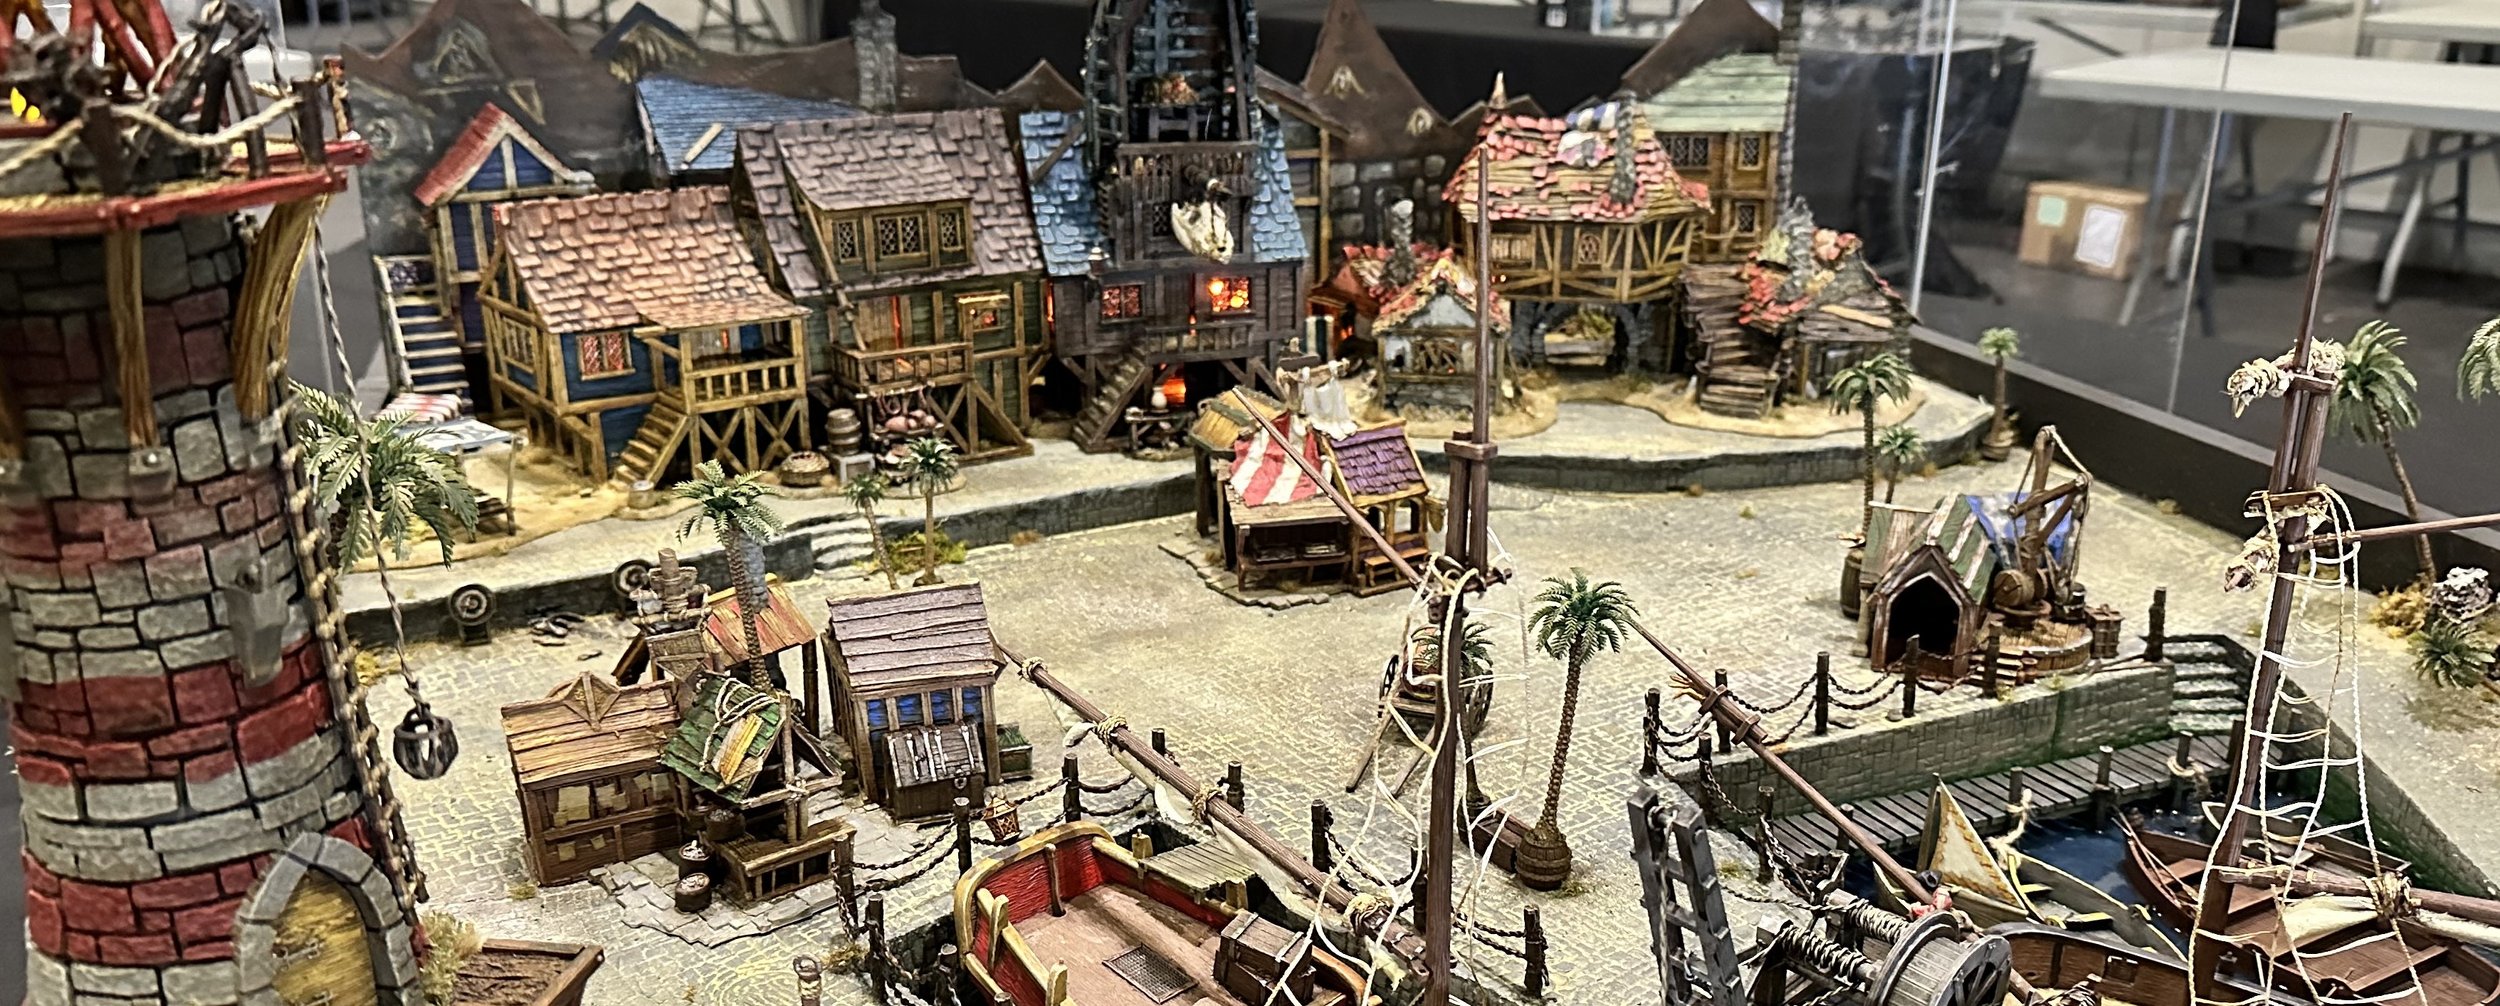
Mick’s Workbench: Booty’s Bilge Base Board
“Named after the captain of the dread ship Wrath, Captain Isadore ‘Booty’ Ruffnel, who arrived at the port when it was no more than a small loading dock. They say the Wrath arrived with not a single crew member, nor Booty himself.”
-Prof Percival Boffinsworth esq. ‘Treasure and Tyrants of Tauber’
Ahoy! Shiver me mainbrace and splice the timbers! Grab your belaying pins: you’re about to be boarded!
Mick here again, this time with a write-up of how we built our beautiful ‘Booty’s Bilge’ demo table for Salute precisely a year ago (am fast typer, me!). Unfortunately I spent a lot longer thinking about the ‘boarded’ pun than the rest of the article, but here we go! A build this awesome is too big to fit into one blog post, so I’ll be breaking it down into two parts- the base board and the town / scenic backdrop.

Snowy Mountains Demo Table
Way Back when I was building the second Moonstone board for Tom, he spent some of the time we were together chatting (excitedly rambling) to me about his plans for future boards. He had tons of ideas* but the two that stood out were his desire for a pirate bay table and the great ‘Walls of Machburg’.
*As normal for Tom, if your’e going to turn on his ideas faucet I suggest you get a big notebook and several pens first.
Machberg is still sitting in our ‘things-to-do-if-we-have-time-and-money-and-aren’t-distracted-by-Kickstarters-new-releases-or-events’ list, but when we heard that last year’s Salute was ‘pirate’ themed, we knew it would be against the pirate code not to get Booty’s Bilge ready for it.
Initial Design and Inspiration
I don’t have either Tom or my initial sketches for the table, which is annoying because even though we drew them up completely independently when we compared them we’d hilariously drawn almost identical pictures! The only real difference was that Tom used some clever curved walls and dock shapes that I loved, so we went with his sketch over mine.
We took inspiration from loads of sources - the pirate town in Hook, the goblin towns in World of Warcraft, Cornish seaside towns, and Tenby and Barry Island in Wales. We wanted a multi-levelled board with water and boats in the foreground, a large open play area in the centre, and a raised area of buildings at the back. We also wanted a tall lighthouse near the front to grab attention and balance out the height at the rear.
Building Tip
Height is one of the best tricks to draw people in, but if it’s all one sided your table can feel more like a display. Adding height to an opposing corner can make the table more immersive for players and is easier for passers-by to see.


Basic Bits
Tom was happy to spend actual money on a new display board (which makes a nice change from scavenging in my shed), so we set off to raid the local hardware store!
The most important basic bits are:
Non-shrink filler in a tube
Milliput
PVA glue
Super glue
A hot glue gun
Our basic bits for the board were:
12mm Plywood for the bases - this is very sturdy, doesn’t warp easily, and can take the battering it’s likely to get between event transport and letting filthy members of the public touch it with their nasty little handsies (I love you really!)
90x10mm planks for the bottom walls
6mm Plywood for the storage box to go over the board and the wooden backdrop piece
20mm x 10mm batons for reinforcing corners and joints
30mm HDF Foam for carving the main base and raised area
A bundle of varying sizes of balsa wood for the wooden details
Bird sand, model train ballast, pea gravel, and lava rocks for the more natural areas
AK weathering pigments- Beach Sand and Light Dust
Then our basic bits for bringing the board to life were:
Plastic fishtank palm trees (cheap, like the budgie!)
3D printed buildings from MyMinifactory and Torbridge Cull (this was the most expensive part of the build by far, costing about £500 just on resin printing!)
Two Pirate ships from Blood and Plunder.
An epic crane, plus barrels, boats, and market stalls from Iron Gates Scenery
Some more resin bits from Bad Squiddo Games because they are awesome friends of ours (They give us bags all the time, and we aren’t going to mention the time we turned up an hour late for a con panicking and everything was cool because they had been running our stall for us!)
Assorted tufts, lichen, and flock from Model Display Products and the bits box.
The Build
Carpentry and Base Layers
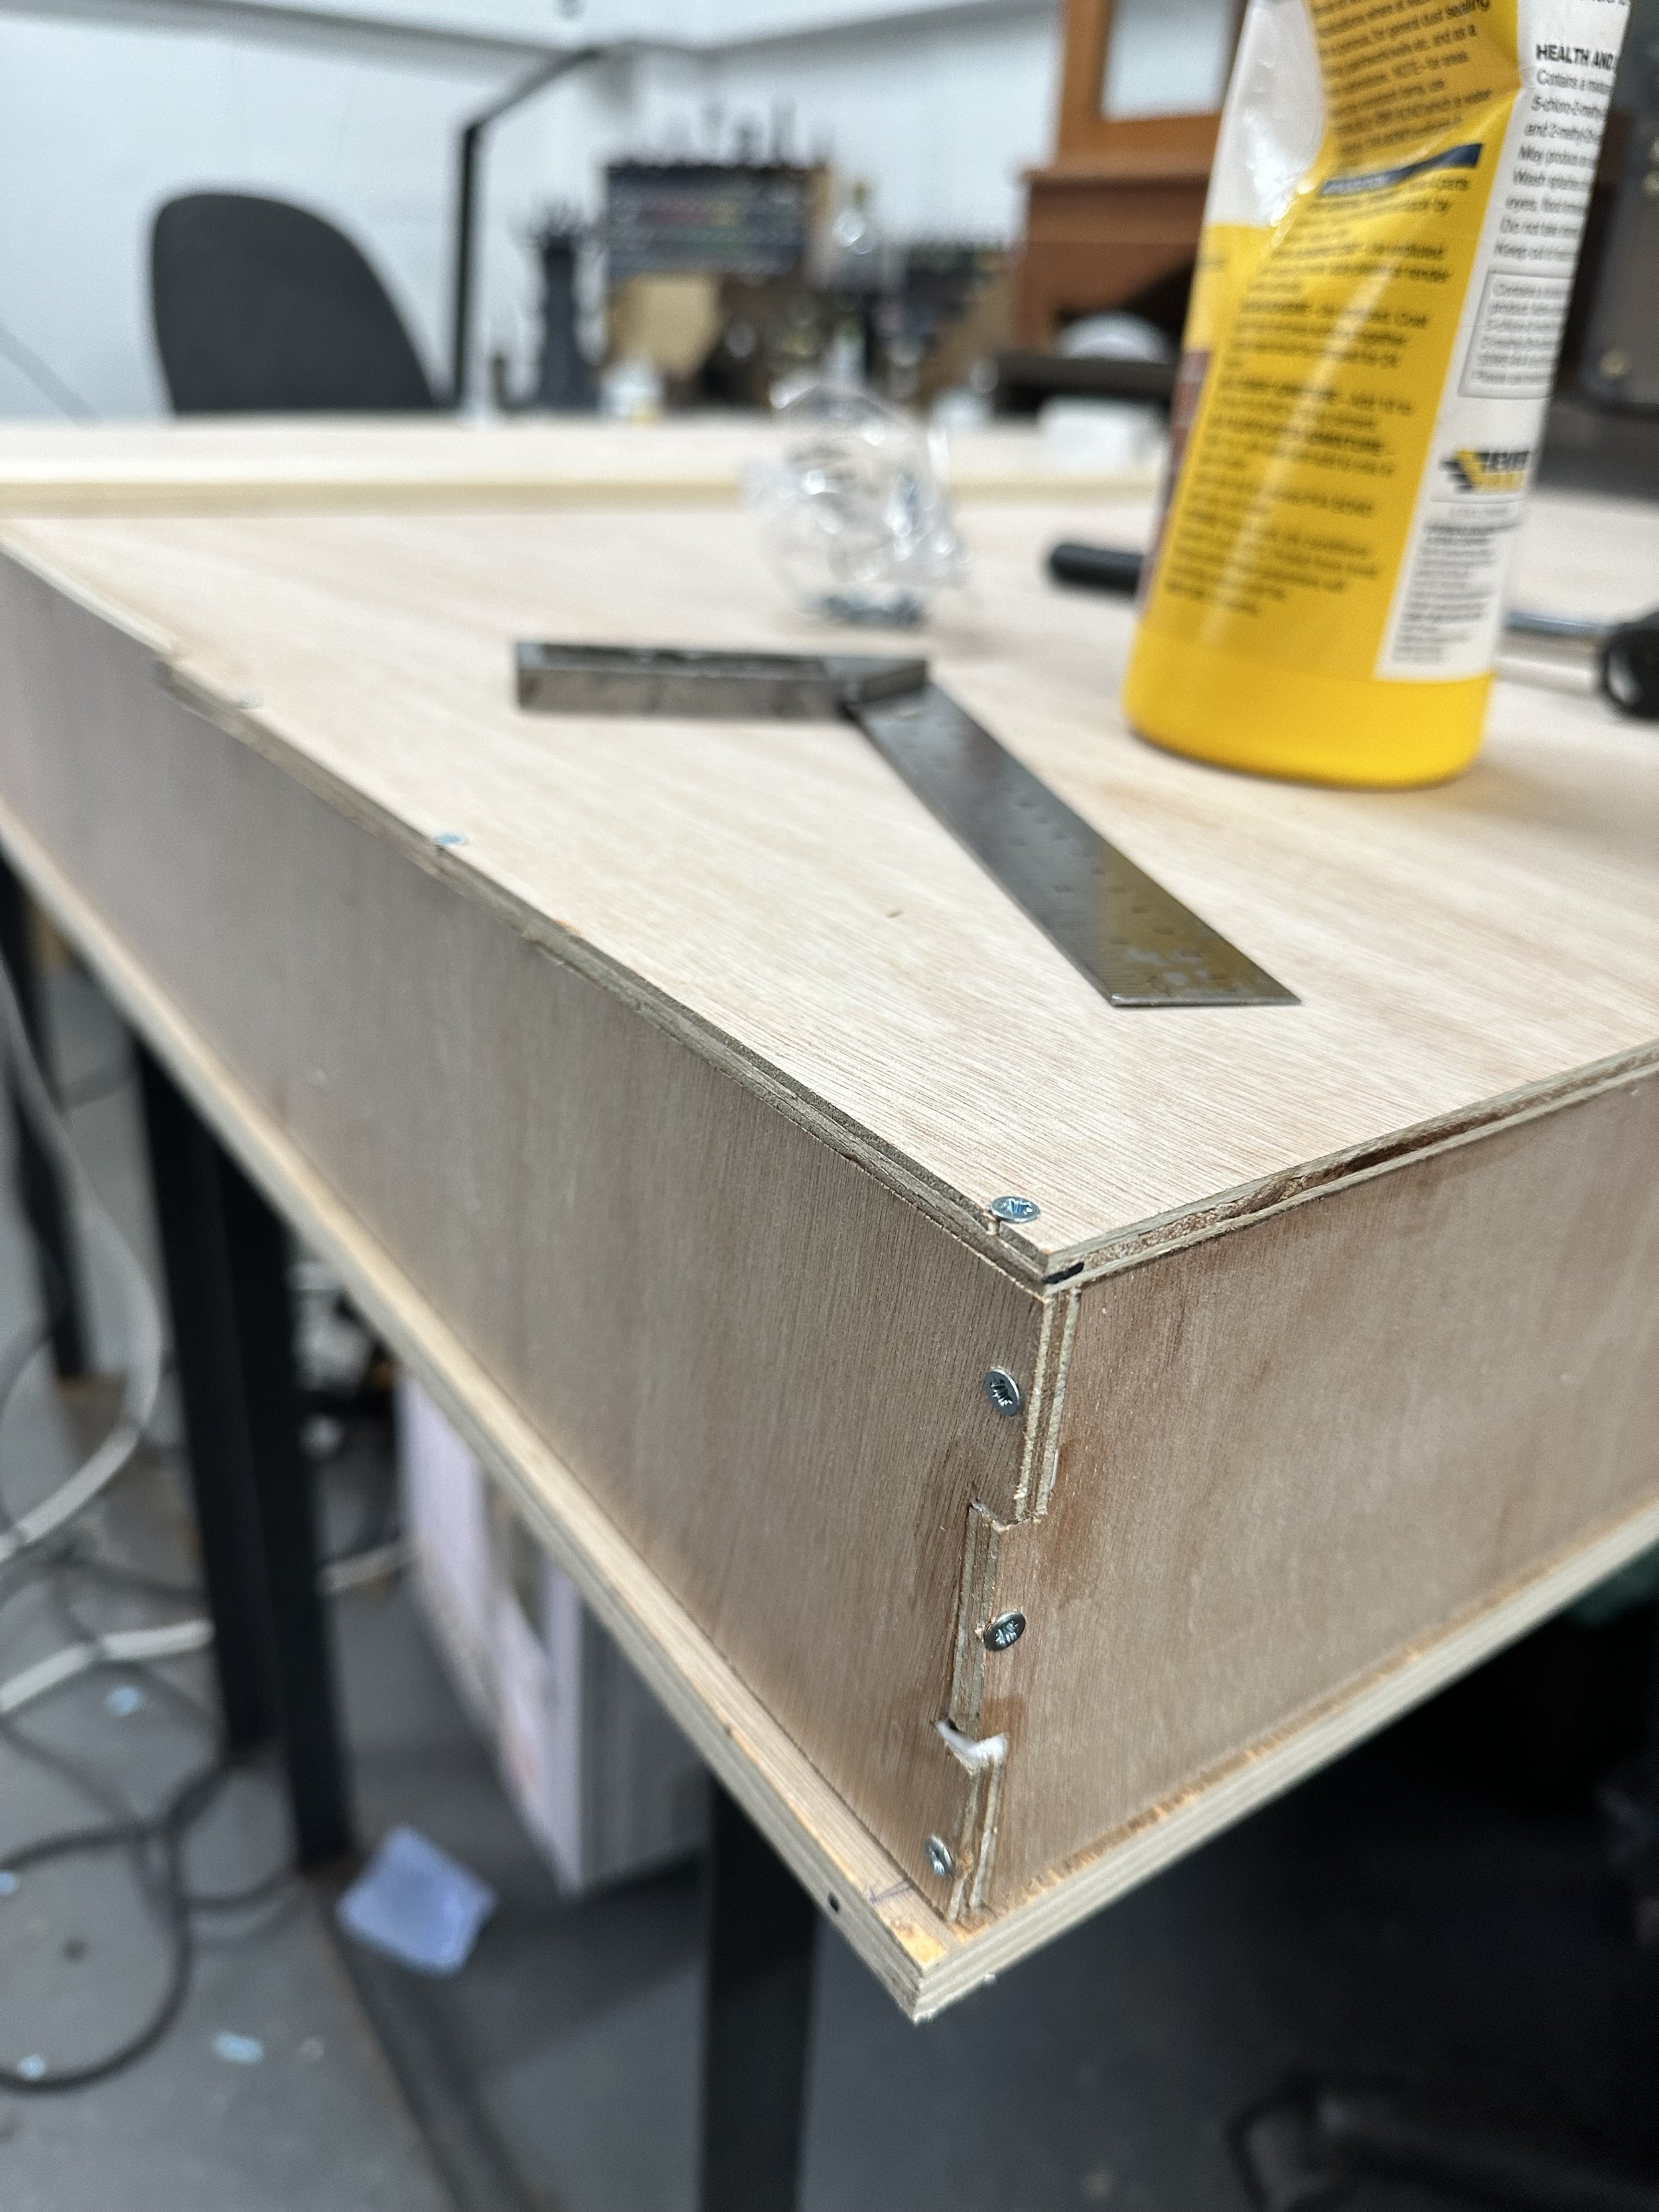
I’m normally happy to do any woodwork required on builds, but my techniques tends to be ‘get it close enough then tidy up the edges afterward’ so I was more than happy to let the Goblin King do the lion’s share of the work here. Tom made the 3x3 frame for the lower walls first, then attached the bottom leaving a small lip around the outside - this would hold the lid when it was finished.
The lid was going to protect the base board in transport, so didn’t need to be as massive as the Moonreach Lid.
Tom was particularly proud of this joint. look at it, nice isn’t it? LOOK AT THE NICE JOINT!
Once this was screwed and glued, we sketched Tom’s design onto the wood and started cutting and fitting the foam. We used nice chunky 50mm foam so each layer would only need a single sheet of foam, giving us nicer cuts along the edge with Tom’s Proxxon (New toy! New toy! New toy!). I’d already assembled the larger ships and 3D printed buildings so we used them as a guide for where everything needed to go, then worked backward from there.
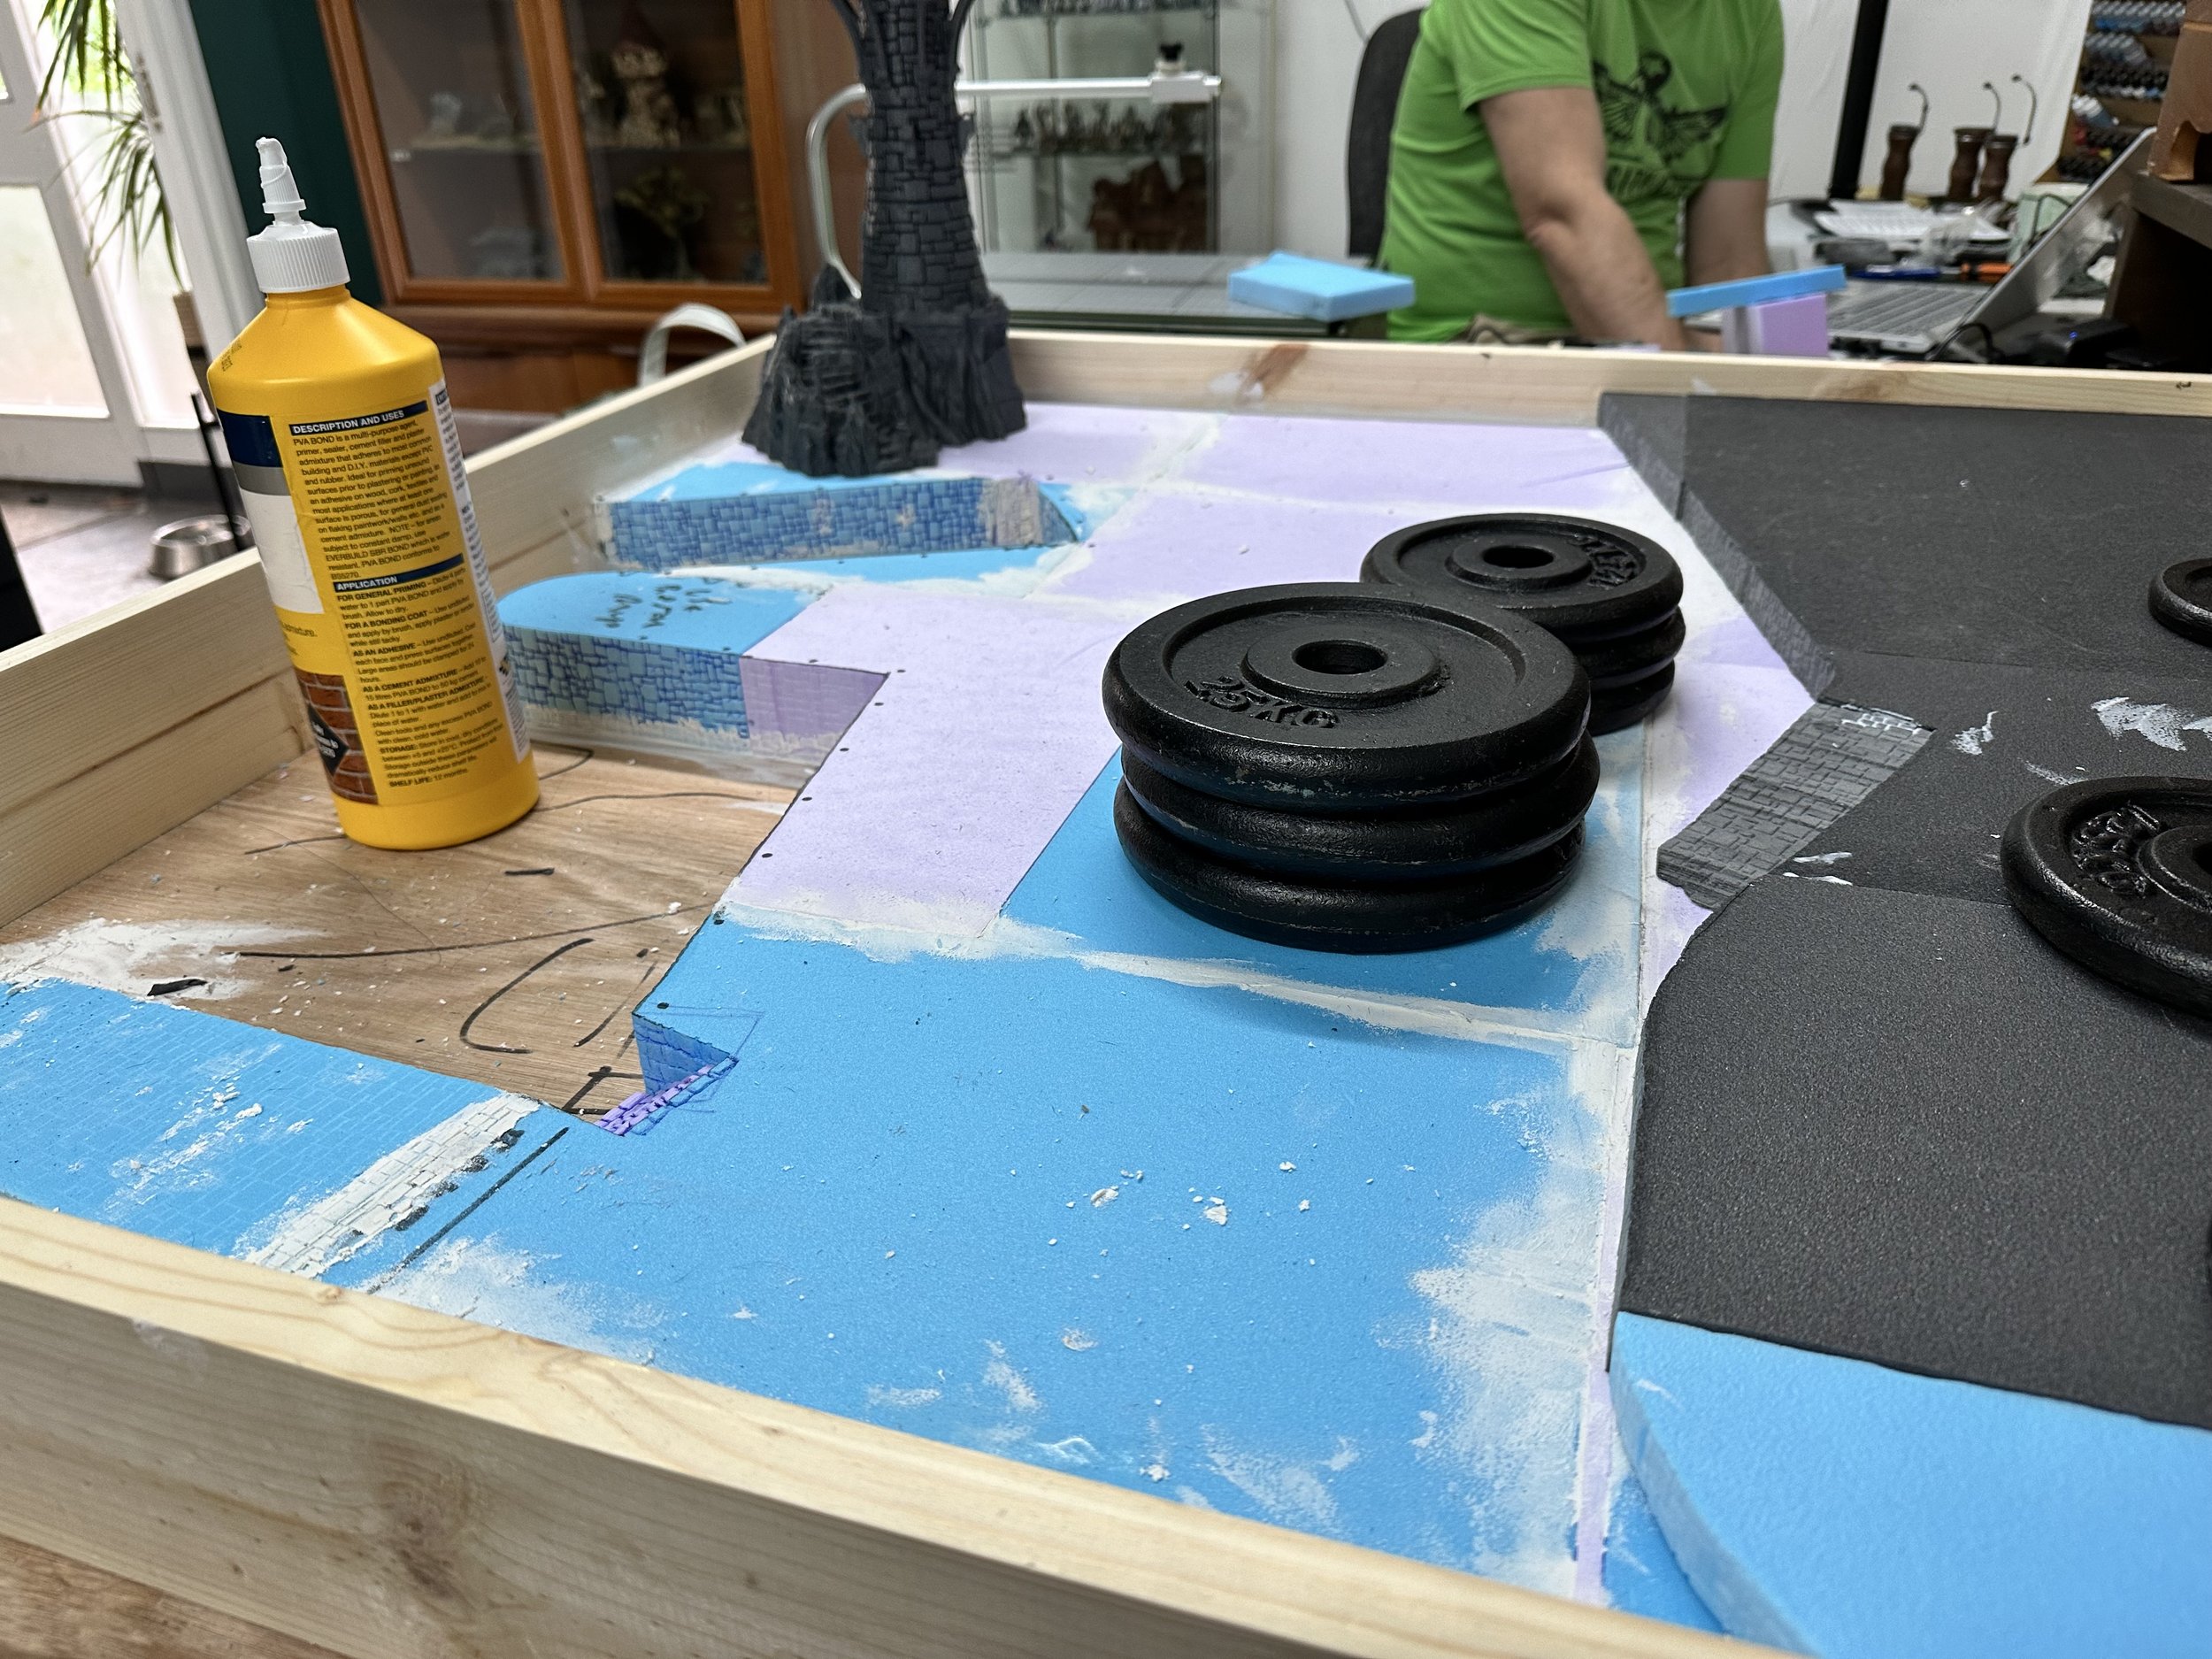
Planning the Water and Extra Bits
It was important that even though the table was specifically a dock, the water area didn’t completely stop play, so we decided to add a lower wooden walkway, a ramp, and as many rafts, boats, and skiffs as we could fit. Eventually, we decided we were happy (stopped pecking over tiny changes like chickens with ADHD) so all the foam was glued in place, the gaps were filled with more foam, Milliput, and filler, and the whole thing was battered with my texturing rock(tm) then left to dry overnight covered in weights.
We used the drying time to build some details to glue on later: the wooden walkways around the dock, some fences using bamboo skewers and chain etc. The movable scatter terrain got finished off at this stage too, including the awesome shops from Torbridge Cull and the little crane from Iron Gates Scenery. The crane came with a little tiny rope to rig it with, but I replaced it (and the crane on the lighthouse) with braided wire because I wanted it to be resilient (again with the filthy little handsies…) We also wanted to chop the base of the lighthouse and shape it, so it came over the edge when fitted - ‘breaking the frame’ like this with non-gaming elements really looks great when you’re trying to show something off.
Building Tip
Tom and Joe played a game on the table to make sure it worked for gameplay. This isn’t a bad idea, especially for Moonstone as once the board is finished we’d be unable to alter it if we discovered all the Moonstones went to see Davey Jones every time we dropped them.


Adding Texture
We’d picked up a textured rolling pin with a cobbled pattern on it, which would be (we hoped) a lot faster than drawing all the cobbles by hand, however, we ran into a few snags.
Where we’d filled gaps the filler / Milliput was too hard to take the roller.
We had different coloured foam (black, pink, and blue) and they all had different levels of resilience. The black took the detail lovely, the pink needed a few lines correcting but the blue just bounced back after a few hours leaving the lines so faint you could barely see them.
The roller had hard flat ends with no detail, so it was almost impossible to roll it into the corners of the table or where the levels meet.

Adding Texture by Hand…
So, because I’m the Dogsbody and he’s the King I destroyed approximately 11 ballpoint pens, my wrist joints and a good chunk of my sanity drawing over the lines left behind by the roller and adding extra lines on the edges, Milliput and filler.
Was this a cr*ppy job? Yes. But it was still faster and nicer looking than making it up as I went along. I also use the roller and pen combo on the dock walls before we glued them down, adding stone texture to them looked really good, and I drew more realistic end stones and curbs to seal the deal.
While I was doing this Tom lounged on his throne eating deep-fried butterflies and drinking distilled children’s birthday wishes (keeps him looking so young). But as I broke my 7th pen he had an idea, and then sculpted an absolutely beautiful little scallop-shaped staircase straight from a Victorian seaside town, as well as adding a genius matching curved lip to protect from waves across the second level. Bastard;)
The cobbles complete, We then coated all the foam in a decent layer of modge-podge to seal it. More modge-podge, and PVA glue and filler was used to attach additional texture such as sand and tiny pebbles to give the board a more realistic feel. We added piled lava rocks (because they are light!) at the edges, suggesting it’s on the very edge of the wilderness.

The Basic Board is Ready
So here is the base board all ready for paint. Keeping it all below the level of the board edge so the box would fit was an interesting restriction, but it came together pretty well in the end. One of the most important things at this point is that it weighs very little, mostly the wood weight. As soon as the resin is added it’s going to weigh a ton more so light at this stage is great news!
Painting

Brown!
All the brown!
A good thick coat of Windsor and Newton’s Burnt Umber across everything was the starting point for the paint job. I much prefer brown to black or white as a base colour for terrain as it’s much more forgiving than white, and black shadows are horribly unrealistic.
Once the base colour was on and drying I broke the painting down into 3 areas: the cobblestones, the sea, and the details. The cobbles were first as they were going to be the messiest thanks to an awful lot of dry brushing.

Base Colours
I wanted to break the solid colour up on the cobbles, so my first task was to paint big swathes of various shades of brown and grey across the whole board. I used sandier colours in the open areas and stone shades on the walls and ramp. This was all done with cheap acrylic paints from an art shop rather than modelling paints.
Once I was happy with the base colours I got my make-up brushes out and started dry brushing. Cheap make-up brushes are a god-send for this, as you can get great results from them and not mind if they get destroyed in the process (they did). The softer hairs on these brushes catch edges much better than stiff bristles and leave less paint behind too.
I worked my way from dry brushing dark to dry brushing light, through dry brushing browns and dry brushing greys to dry brushing bone colours, with a final very delicate drybrush of white in certain areas*. I even made sure to catch the wood, chains, rocks and other details around the place with the final highlights as it would make painting them faster later on.
*If you feel I’m using ‘dry brushing’ too much here it’s because I want you to really feel quite how much dry brushing this was. Dry brushing. The words are losing all meaning…
Painting the Water


The water was possibly the easiest paint job on the board (at least to start with). I thickly layered on some cheap vibrant blue craft acrylic, taking care that any brushstrokes made sense as waves or ripples. Whilst this was still wet I worked in Pthalho Green(?) into it, starting dark in the middle where the water is deepest, then getting lighter and lighter towards the edges. I kept the brush strokes and stipples in wave patterns where I could. That was it for now as I had some ideas for later, but they’d be best done after I’d mucked about with varnish and pigments!

Details Time, Baby!
Now all the painting with a massive brush was out of the way, it was time to have some fun! (You can see in the image here that I added pigments to the cobbles too, but I’ll talk about that in a bit.)
Tom told me to “sling my hook” here and banished both me and the table to my dining room, so he could keep playtesting Shades with Joe, so it’s lonely work from now on!
There was a fair amount of wood to start with: the pier, boats, fences, and crane all needed some brown in their life, and as wood is really textured you’ll never guess which painting technique I used to hammer these out. (Here’s a hint: it rhymes with “cry slushing”.)
This is where the final white Drybrush from earlier makes life super easy - all the wood that was already stuck to the table could just be given a thinned coat of contrast paint and it immediately looked great. The other woods worked through different shades of brown scattered around and then highlighted them up with either dry brushing or very simple layering.
Basing Materials
The first thing I needed to get done before any tufts and foliage was the pigments. We’d picked up two weathering powders from Model Display Products - AK Interactives Desert Sand and Light Dust. Usually by now I’d have inked the living heck out of the cobbles, but we we’re trying something new here, and as much as it was killing me I had to go for it!

Starting with the Light Dust, I gave a gentle coating to the entire cobbled and rock sections of the board, making sure to build it up more heavily in the areas where wind and footfall would pile sand and dust. Gently brushing it off the raised areas meant it settled down into the cracks in the cobbles like grout and frankly looked ace.
A quick spray of hairspray to fix it, and then I started adding the Desert Sand in random patches here there and everywhere to break up the uniformity, again adding a bit more in places where it would naturally build up. Then I sighed and cleaned it off all the surface that SHOULDN’T be sandy, like the sea, before another coat of hairspray.

Looking Good so Far!
Usually when I’m making a board I can cover any mistakes or mis-steps in flock, tufts and other basing materials, but this sandy theme meant I had to actually get it right…
The upside of this is that I just had to add some tawny tufts and lichen where they were actually needed and would look good: cracks in the cobbles, where the wall met the floor, the rocky areas etc.
Tufts really bring a table like this to life, but too many could force away the beachy vibe we wanted.
Palm Trees
Palm trees were the next addition and boy did I make my life hard for no reason here! I spent hours looking for good palm tree STL’s, checked sizes, talked to printers, costed them up, got Tom’s sign off, found out the STL’s were broken and wouldn’t print well and tried again.. and again…
And then my beautiful and annoyingly smug wife suggested I just get some fish tank palm trees, which I found online for the astonishingly cheap price of £10 for 40 in varying sizes*. They arrived the next day and need a bit of painting - after cleaning mould lines off I did a quick slapchop of brown and green to give them life. As fish tank ornaments they came with little spikes on the bottom, which made them ideal to just jab into the foam, rocks and other places I wanted them - mostly around the wilder areas. Although I saved a few for something later on.
*I have now added “just because you CAN 3D print doesn’t mean you always SHOULD 3D print” to Mick’s book of terrain phrase and fable.
What’s Next
Now that the base board is done (except for the resin), I get to ship it back to GKGHQ for Tom to take over.
In the next article (which will hopefully be in less than a year’s time) we’ll cover the 3D printed buildings and the backdrop, which will (and I know this will shock you) involve yet more dry brushing…
Mick

Waiting for Tom to pour the resin - you can’t go trusting me with one shot tasks like that!