Early Bird vs Initiative
A while ago I did an article on some in-depth game mechanics, namely Activation Control, and it proved quite popular. So today we'll look at some more core game mechanics and something which is very much related and expands on the previous article. This is one of the first decisions of the game, do you choose initiative or early bird?
The Basic Benefits and How to Choose
As mentioned a lot in the Activation Control article, the initiative gives the player with it great control over the flow of every turn by making them more likely to choose who activates first. Specifically, it lets the player with initiative choose which player activates first turn 1. Following this, it then gives them a diminishing bonus as the turns go on to win the roll-off as to who decides who activates first. This is a massive advantage and so to give it up you'd need another equally powerful bonus, early bird. This simply allows the player to choose which side of the board they will play on. Most importantly, this is done after the drop of the Moonstones. Therefore some players and troupes will be able to see how the stones drop and craft a plan on how to deal with the stones on one side and then choose to deploy on that side.
When you win the roll-off at the start of the game you can quite happily choose whichever bonus your troupe prefers. Most troupes in the game will have a playstyle that's supported by initiative or early bird and a player's choice can simply be informed by that. Half the time though, you will not be choosing if you have initiative or early bird and that choice will go to your opponent. It's therefore handy to know how your troupe can adapt to this and when drafting your troupe during an event you can adapt by drafting certain models. So what are some of the less obvious bonuses and playstyles that each choice presents and how can your troupe adapt to them?
Initiative Overview
The initiative is never a bad thing to have, a bonus to choosing who activates first often means you can dictate the flow of each turn. In terms of how likely you are to win the roll-off with initiative:
+0: 50%
+1: 68%
+2: 81%
+3: 91%
Timing of First and Last Activations
If the timing of your first or last activation is very important to your game plan this bonus is invaluable. You can also with a little luck time your activations right so you activate last on one turn, win the roll-off in the next turn and then activate first that turn. Activating the same model twice in a row can be devastating. With a model like Fritz, for example, he could make 6 back to back melee attacks without giving your opponent a window to heal.

The Duchess’ card.
Influencing the Roll-Off
But why have I listed how likely you are to win with +3 to the roll, isn't it a max +2 on the second turn? Well, there are also models with abilities that can influence the roll-off. Duchess for example grants a simple +1 to all roll-offs. If you're not playing Dominion, you can instead rely on Brother Daniel's roll-off bonus, forcing your opponent to reroll their dice, perfect for when they roll a 6! Models like these can be perfect for offsetting losing the initiative if you really wanted it or doubling down on the bonus if you do get the initiative.
Even Moonstone Drops
If your troupe doesn't have a specific plan in mind for initiative or early bird though, when might it be a good time to take the initiative? The best time to take initiative in these situations is often when the moonstone drop is relatively even. If a moonstone drop is completely even there is often no advantage to any one specific side of the board. In these cases, Initiative is a far better bonus and so it is often the better choice.
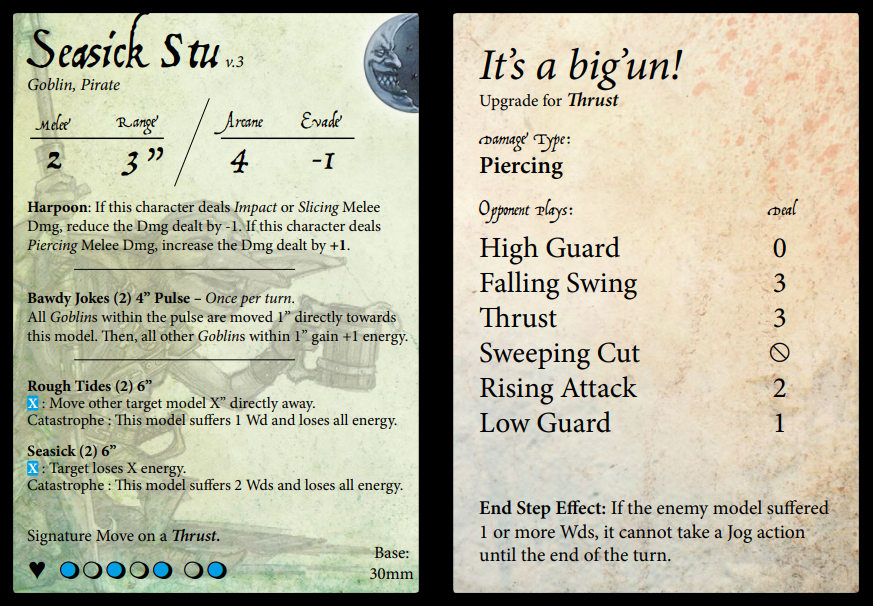
Seasick’s card.
Troupes that Benefit from Initiative
But what about those cases when you have a troupe that benefits from the initiative, what do those troupes look like?
Energy Focus Troupes
Generally speaking, troupes that interact with or have a large focus on energy really like the initiative. Faeries for example love winning the roll-off so they can force their opponents to go first and play reactively around them. This is also relevant for other high energy troupes like fauns and goblins, but faeries are definitely the most extreme such troupe. Speaking of goblins, models like Seasick Stu also love the initiative for energy related reasons. Being able to win the roll-off and activate first means energy sappers can go first and target opponents before they have an opportunity to activate. For some troupes which need or rely on one model, this can be devastating.
Energy Manipulation Troupes

Flintlock’s card.
Energy manipulation troupes can also stack huge amounts of energy onto one model, which will then go on a rampage later in the turn. In these cases, these troupes quite like to have the last activation to leave their opponent's troupe all activated and vulnerable before their energy stacked model activates. This is more the case when a ranged model, like Flintlock, is the target of the buffs. Ranged models love the last activation as they can shoot at enemies with an aim to wound them enough so they don't gain as much energy the next turn. So as well as troupes that focus around a singular ranged model like flintlock other ranged troupes, like gnomes, may also enjoy the initiative for this reason. They can then try and activate first the following turn to finish off badly wounded enemies in a way that melee models can't do as easily. It's easy to use a reaction step to move out of a 2" melee, but a lot harder to use a reaction step to move out of Flintlocks 12" musket!
Back-to-Back Activations
I also earlier alluded to making back to back activations with troupes being a very powerful strategy for some. The most straightforward troupe is one with huge combat power. Fritz for example making 3 melee attacks into a troupe at the end of the turn and then another 3 attacks at the start of the next turn will devastate any troupe.
Liv’s card.
A troupe that requires slightly more finesse though which also loves the initiative just as much is the Norse. With a back to back activation they can stack the deck, then immediately make use of it without an opponent disrupting it. Finally, rogues can make use of this by jumping into a melee to steal a stone then immediately replenishing their energy and activating again at the start of the next turn to run. This strategy of going for double activations can be even more powerful if you slay some of the opponent's models to deny them some activations. Eventually, with the right troupe, this can snowball to multiple back to back activations without having to even think about the initiative!
Why Choose Early Bird
If the initiative is so great then, why would you ever choose early bird? Initiative as previously mentioned certainly does make fighting and dealing damage easier, but early bird usually makes it easier to harvest stones and that's how you win! If the moonstones are slightly more skewed to one side than the other you'll be able to have the opportunity to harvest them first. As well as the number of moonstones a certain side of the board may have, one side might also have moonstones of a lower depth meaning you can harvest them faster. As well as choosing a side that makes harvesting easier for you, you could also choose a side that makes harvesting harder for your opponent. If for example on one side of the board the moonstones are very widely dispersed you may choose the other side to force your opponent to use the dispersed moonstone side. Against some troupes that need to bunch together like gnomes, this can severely disrupt their game plans.
Using Terrain

Bristlenose’s card.
Although I just mentioned that initiative is usually a better choice for combat and damage dealing there are some factors that mean early bird is sometimes a good option for some of these troupes too. This often comes in the form of where terrain is placed on the board and some models that utilise terrain. The most straightforward example of this is Bristlenose. If you have Bristlenose and one side of the table has a water feature, you might want to choose early bird and deploy there. Alternatively, if your opponent has a model like Bristlenose you may take early bird yourself to stop them from getting access to the water feature. You can also pick tableside to avoid specific terrain features. So if your opponent has Joanna, deploy on the side without any trees or wooded patches to avoid her ranged attacks.
Effecting Deployment
Like with the initiative there are models which can have an effect on deployment. Currently, the main one is Peggy who lets a model jog before the game begins, essentially allowing one pirate a 14" deployment zone. Other troupes can partially imitate this with models that can move friendly models. So, when the moved model starts their activation it'll be further up the board, outside their deployment. When a model starts their first activation outside its deployment zone it'll be able to avoid spending energy taking step actions and can get on with spending its energy for other stuff. Ranged models with particularly short ranges love this as it means they can get into range more easily on turn 1 and still have the energy to start blasting. Meanwhile, melee models with long engagement ranges can reach moonstones near the center of the board more easily, covering them with their melee zones and preventing opponents from harvesting them. If your troupe doesn't have a specific plan in mind for initiative or early bird though, when might it be a good time to take the early bird? Usually, early bird is a good choice if the stones are skewed to one side more so than the other. As mentioned earlier it's also good for avoiding a board edge that may have awkward terrain or maybe forcing your opponent to deploy in that awful terrain instead!
Clustering Around a Single Model

Mama Gimble’s card.
But what do troupes which specifically benefit from early bird look like? Troupes that often cluster together around a single model can use early bird to a good effect if the stones on one side drop in a clustered manner. Commonwealth gnome and noble troupes which focus on big melee hitters love these clustered formations of moonstones as they can jump on them and defend them whilst a supporting character harvests them all. On the flip side, troupes that love to spread out, like fauns, may sometimes want to go for early bird to ensure they can deploy on a side which means they don't have to cluster up.
Grab and Defend
The other troupe archetype that can make good use of early bird is troupes that attempt to grab as many stones as possible and then play defensively. For example, Leshavult animal troupes that focus on mobility may choose early bird to choose the table edge which has 3 stones in its deployment and one on the centerline. These moonstone spreads are great for these troupes as one model can rocket up the board to grab the center stone whilst the rest of the troupe works on the stones in the deployment zone. Alternatively, it could be a moonstone spread where 4 stones are in one half of the table, both types of moonstone spreads are good for smash and grab style troupes. Taking board edge here can also prevent your opponent from choosing a side that hampers this strategy.
A crafty opponent who sees a smash and grab attempt coming may take the board side where they can put a melee zone over the majority of the stones ASAP, preventing any harvesting. If you do get early bird though your opponent will now definitely have initiative. You'll now need to look out for their models which have lure abilities. These can activate last on the first turn to pull your model stacked with stones into their troupe, then a combat model like Fritz activates first next turn to slay your stone carrier.
Finally, some troupes have a huge focus on certain terrain features. Faeries for example may choose early bird to take the board side with more forest. This can give them enhanced mobility with Herbert and a safe place to hide whilst they fire off their arcane attacks at enemies. Similarly, the upcoming treefolk also love wooded patches and so they may choose a board edge because it has many of these. This can give them a massive boost in durability and energy as well as more powerful and reliable arcane abilities.
Conculsion
In summary, early bird or initiative can help to amplify a chosen troupe's playstyle or a troupe can be built to take advantage of early bird or initiative. If you win the roll-off and have to decide between early bird or initiative you can choose based on your troupe's playstyle to maximise their effectiveness. Alternatively, if your opponent decides, you can tweak your troupe to take advantage of the option they have left you. There are also a few troupes that relish either choice and in these cases, the drop of the moonstones, placement of terrain and opponents troupe can help steer your choice. With all this in mind, your troupe will be able to adapt to any situation and take advantage of every opportunity and circumstance the board and your opponent offers!