Mick’s Workbench: Making a Faunish Travelling Tent
Hello! We had the first terrain building vote over on the Facebook players page and you voted for the Faunish travelling tent - I wanted to start with a little lore to tell you exactly what we’ll be building...
Faunish Living
You’re most likely to find Fauns in the woods towards the south of Tauber, where they’ve lived for generations. Although, as with all the people across Tauber, this isn’t a rule (and the only clear territorial demarcation is the Faeries around Nightshade). Fauns tend to be found in wilder locations, but some have adapted to life in large towns and cities, as evidenced by ‘The Wobbly Hoofprints’ - a boisterous Faun-owned tavern in Sunrise City. Fauns are reliable traders so, even if they don’t live in larger towns and cities, small parties will frequently be seen there together.
Fauns have always been nomadic, with the urge to travel in their blood - although now the tribe as a whole will only move between two or three Ancestral locations. There are four tribes (plus the settlement around the Leshavult Temple to Tjaldhiminn, which doesn’t move), meaning there are around eleven potential locations you could find them. Faunish towns and villages are designed to be moved, or abandoned for many years before being reused when a local resource is needed. Key buildings, such as storage barns or Gathering Halls, are often solidly built and able to be effectively shut up if Fauns choose to leave the location. Other buildings are simple huts, lodges, and large tents made from skins - all of which can be easily dismantled and moved as wanted.
Before settling into their tribes (which happened long before the Forgotten King came to power), Fauns travelled in small groups across Tauber. Sometimes the groups joined together into dozens of families in a larger caravan, trading as they moved and setting up temporary homes as they went. Tribal life has meant a reduction in the frequency of relocation, but Faunish travelling tents are a tradition that have remained from these earliest times.
When a group of Fauns know they’ll be out in the wilderness each member of the group carries with them long ropes, a wooden peg, and a large triangular waxed skin. The skin is often brightly painted by its owner with icons associated with their tribe, nature-based imagery, or Leshavit designs. This decoration serves to identify who it belongs to and also shows who is in residence in each tent at larger gatherings.
When night falls or the group decides to call it a day, they will look for a solid tree (making sure that it isn’t a Treefolk, who have a strong dislike of being used to anchor tents). They attach ropes to the tree and each sheet is then, in turn, tied to both the tree and the sheet next to it, then pegged out. The tents fan around the tree and if enough Fauns are travelling the tents can even completely encircle the tree’s base. This combined tent is then shared by all present (Fauns being communal by nature, except Boris, but then Boris is unusual in many, many ways...) and when the fauns break it down to go their separate ways, they each take their tent-skin with them.
The tent we’re building today is going to be a simple three-Faun tent, probably for Jayda, Hoff and Mr Toodles as they hunt for moonstones.
Materials Needed
Copper wire - I used .1mm but anything from .1 to .5mm would work
A twig - I tend to grab them from outside but on this occasion, I’m using part of a plastic tree from IKEA (it was cheap and didn’t need to dry out - Wales has been very Wales-ish lately)
Small piece of cloth or paper - I’m using kitchen roll
A base - I’m using a cork coaster but wood or foamboard would work fine
4 cocktail sticks (or the number of tents you’re making +1)
Hot glue, PVA glue, flock, sand, tufts, gravel, standard terrain fare!
A little bit of milliput or air-drying clay (optional, for beds and details)
Below template - (or something roughly like it)
Video Guide
The Build
Firstly we’ll cut our base to shape and attach the tree off to one side, maybe add rocks for stability. For me this means picking the edges of my cork tile until it has a natural, rough shape. The plastic tree has a nice hollow in the bottom so I’m going to attach it via a screw and some superglue and PVA.
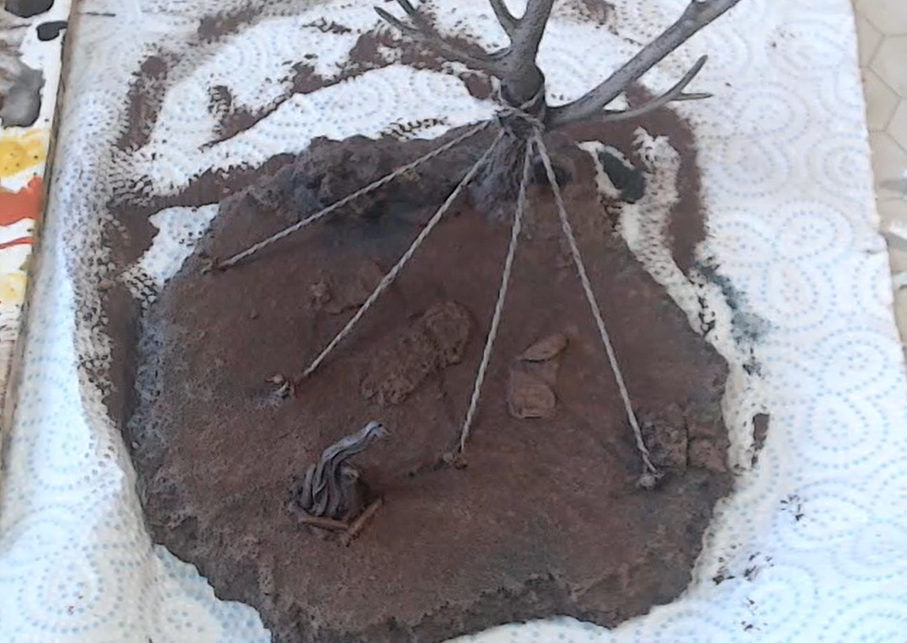
Now we’ll add some camp bits - these are optional but they add a nice bit of character. I’ve got a resin fiery smoke… thing…? from a miscast Loubard that I will use as my campfire, and I’ll make some rough sleeping blankets and sacks with milliput. I’ve also added some roots to the tree’s base and a couple of small rock piles with leftover cork.
Here’s a boring bit but you can speed it up with a drill or Dremel. Cut off a length of wire about 20cm, fold it in half, pop a stick in the fold and then twist the wires together using the drill. until they are nice and tight like rope. Then do this all again 4 times. This should leave you with 4 x 10 cm (ish) pieces of twisted wire ‘ropes’. I’ve used floristry wire here, because firstly it comes in nice small sections already, but mainly because it’s coated in paper and takes paint well.
About 3-4cm up the tree trunk tie the ropes around the tree at one end, leaving about 6-8cm of wire coming away from the tree for the tent’s guide ropes.
Chop off a short stump of cocktail stick, twist one end of each wire a couple times around it, pull it taught and glue the end of the stick into the ground leaving space for the templates main body between each rope.
Using PVS glue attach sand to texture all sections of the base you want to represent earth.
Make sure everything is glued down (best to leave it overnight to be sure) and paint it (see Painting the Build below) because once the cloth is on it’s a pain in the hoof to get under it, trust me!
Cut the cloth/paper into weird triangles like the pattern supplied above.
Dunk all three sheets one at a time into a mix of slightly watered down PVA glue and a light brown/tan paint. A note about texture here: if you are using textured paper like kitchen roll it will retain some texture afterwards, which can look good if it’s the right pattern.
Hang the first tent over two wires, wrap the tabbed bits around the wires and squeeze them together to hold them in place. then add the second tent. This time wrap the tabs on one side around the next set of wires, and spread the other tabs out over the top of the first sheet- do the same again for each section of tent you are making.
Once this is dry and the sheet is hardened, paint designs on (see Painting the Tent below).
Add flock, tufts, pigment etc to your liking!


Painting the Build
Base the whole lot dark brown, I used cheap brown acrylic from a craft store for this. Mottle some patches of green, yellow and maybe even blue in there as you go to break up the colour.
Drybrush the tree with shades of dark to silvery grey, (I used army painter Deep Grey. Ash Grey then Warm Stone) then apply a couple of patches of green ink in some of the recesses.
Drybrush the ground brown, from dark (but lighter than the base coat) around the tree base getting lighter as you progress. (I used Army Painter Oak Brown first, then Dryad Brown, Desert Yellow, Skeleton Bone and finally Arid Earth) the lightest you go should be a very faint tan/bone colour.
Any rocks can be painted grey, beige brown - whatever suits your table.
Paint the ropes light brown, and the details inside the tent however you like, rough cloth looks best. You can also paint the fire if you have one etc.
Ink everything EXCEPT the fire (Citadel Agrax Earthshade or a similar shade of brown/sepia).
Go back in with highlights where needed.
Varnish.


Painting the Tent
It should already be a nice light or mottled brown from the PVA/paint mix.
Light drybrush beige towards the top (Army Painter Skeleton Bone.)
Paint symbols on each sheet - these can be as crude as you like as Faunish art is very organic. Use fainter markings for older sheets and bright colours for younger ones. Celtic and Neolithic (or similar) art can provide inspiration here, but be mindful of using anything culturally inappropriate. Feel free to let your imagination go - maybe Kavanaugh has been travelling with Fauns to pick up this habit and decorated his own tent (I do not want to know what that little weirdo has painted!).
If you’re worried your freehand isn’t up to scratch I suggest using watercolour pencils then painting over with varnish, or even permanent markers can work


Once everything’s painted and dry you can give the whole thing a quick blast of matte varnish and your Fauns are good to sleep under the stars, waiting for those moonstones to appear!
Hope you’ve enjoyed this little tutorial, If you do make any Faunish tents make sure you share them with us in the Facebook Players group or on our Discord :)
Thanks for reading, there’s more on the way and, once again, see you across the table!
Mick


