Activation Control
Recently when writing about Moonstone strategies and tactics I have focussed on a single character or troupe.
This time, something a little different, as I fancied taking an in-depth look at a core game mechanic and expanding on it as much as possible. So what is activation control and how can you use it to the best advantage?
What is Activation Control
Activation Control is timing your activations to use your models at the best time whilst simultaneously forcing your opponent to activate their models in a sub-optimal way. This can be particularly effective in moonstone as some models get far more powerful the later they activate and some get better the earlier they activate. Some models even change roles entirely, instead of getting stronger or weaker. The last point is particularly important if you're forced into activating a model at the wrong time as it means you can still use their activation in an efficient, if not planned, way.
Energy Draining and Debuffing
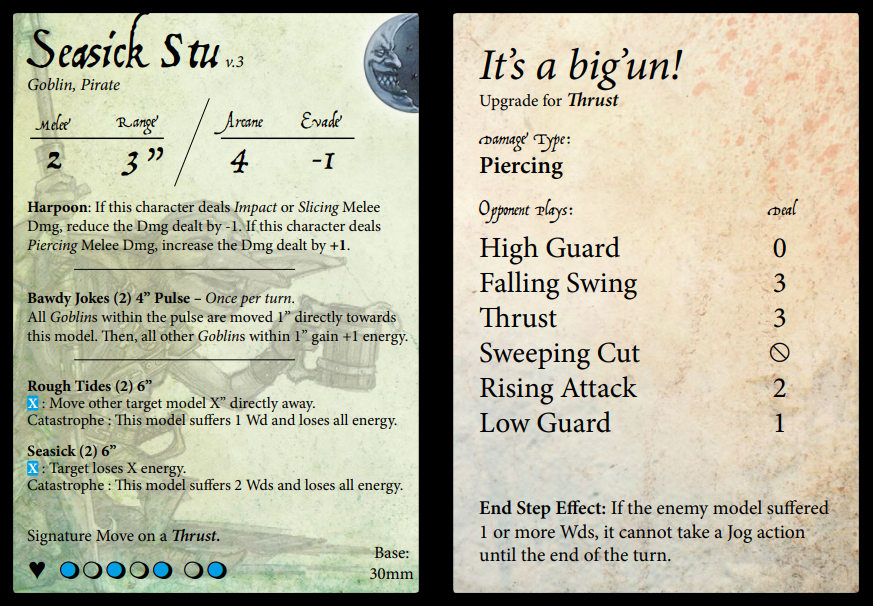
Seasick’s card.
One example of an ability that gets better the earlier you activate it is energy draining. With an earlier activation, more models have energy and you will likely be able to blunt a particular model's activation by starving it of energy. This in turn can force your opponent to activate a model prematurely to avoid them having their energy drained before they activate. In practice, this could be Seasick Stu using 'Seasick' on Baron Von Fancyhat to blunt his activation by removing large amounts of his energy. Alternatively, if the Baron predicts this and activates before Stu it will be a sub-optimal activation as Eric won't be able to donate his energy to the Baron with 'My Hero' first.
It isn't just energy manipulation that this can be applied to though. Pretty much any debuff on an enemy gets better the earlier you can apply it as it'll last longer. For Stu and Fancyhat again this can be Stu draining all of the Baron's energy and then trying to hit Fancyhat with his signature. If the right cards are drawn this can leave the Baron with no energy and no jog when he does eventually activate. The threat of being able to do this can often force opponents to make activations at a sub-optimal time and let you dictate the flow of the turn. On the other hand, buffing friendlies is also more efficient earlier in the turn for a similar reason - the buff will last longer. This can include abilities that buff stats, give special conditions or even abilities that grant additional energy.
Strong Abilities Near the End of Turn
On the other hand, some abilities get stronger the later you make use of them. This is usually as most models will have used up all their energy near the end of the turn leaving them more vulnerable to certain abilities. Therefore, most abilities that get stronger near the end of the turn are ones that can normally be countered or mitigated by movement through reaction steps. Longer melee ranges are one such "ability" since they can be used to attack models with short melee ranges with impunity. The usual defence to a long-range melee attack is to step in with your melee zone or out of theirs, but if it's near the end of the turn and a model has no energy this is no longer a solution.
Healing
The other very common ability which gets stronger the later you use it is healing. As models generate energy equal to energy pips uncovered by wounds at the start of the turn healers can indirectly give models energy as well as wounds. By waiting to the end of the turn to do this you can cherry-pick models which are one or two wounds away from an additional energy. This will allow you to enter the next turn far more energised than if you healed at random earlier in the turn. A healer that hasn't activated is also a great deterrent to your opponent for dealing damage as they may hold off attacking sometimes at the threat of all their work being undone in one healing activation.
Enemies Have no Energy

Boom Boom’s card.
As well as low energy, a model near the end of the turn will often have activated. This means as well as using up most of their energy they will have often used up their jog too. When this is the case, they are a perfect target for movement abilities like Agatha Tavernfrau's 'Enticing offer' or Boom Boom Mcboom's 'You'll never get this! Nah-na-na!'. With no jog and no energy, they will not be able to reaction step out of harm's way and they will not be able to jog to a safe place. This will leave them out of position with no energy or jog to change where they are and will leave them as an easy target for the rest of the luring troupe.
Start of Turn is Sometimes Better
With all this in mind, some models will want to activate early every turn and some would like to activate late every turn. There are sometimes models with some abilities that are more effective at the start and some abilities that are more effective at the end of the turn. Two such models are Eric and Stu who can both make use of some energy manipulation abilities near the start of the turn. They can also make use of some abilities that are most effective near the end of the turn like healing and a long melee range respectively. Models like this can be flexible on when they activate because of this but will often not be able to make use of all their abilities to their full potential.
Initiative
The initiative is also a huge factor in activation control. If an ability gets better the earlier you use it in the turn then it will be at its most effective if it's the first action of the turn! Similarly, an ability that gets the most mileage out of going later will be potentially devastating if it's the last action of the turn. If choosing whether you have initiative or tableside at the start of the game it can be important to keep this in mind if any of your models desperately want first or last activation to help keep initiative in your favour.
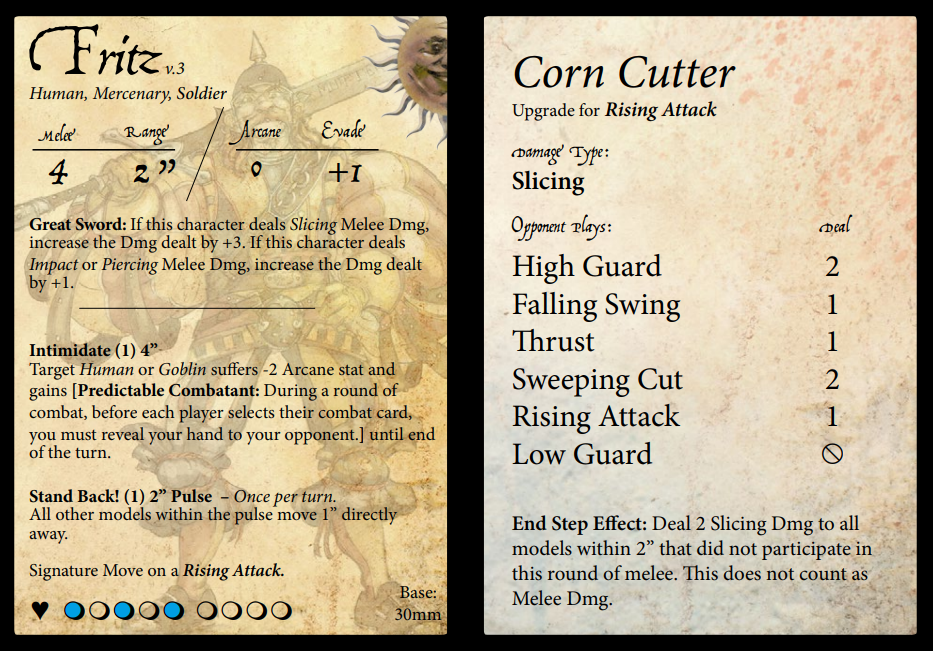
One such model this may be a consideration for is Fritz whose damage output is so high he can kill opponents models even when they haven't activated. Killing models which haven't activated reduces the number of activations an opponent has during their turn and will often lose them the last activation as a result. It can also have the knock on effect in future turns of allowing you to finish turns with multiple back to back activations as your opponent loses more and more activations. Killing models which haven't been activated is often quite hard though due to reaction steps and other abilities. In the case of Fritz though and his absurd damage output he can usually power through these obstacles and slay full health, full energy models anyway!
Moonstone Manipulation
On the flip side, having the last activation allows different kinds of abilities to shine. One such ability is 'Robbery' or other moonstone manipulation abilities which hit your opponent. If saved for the last activation you can easily end the turn with a two moonstone swing, one moonstone lost for your opponent, one moonstone gained for you! This is particularly devastating as the last activation of the last turn, allowing you to play one moonstone down for the entire game until the very last activation of the game when it becomes a one moonstone advantage! This doesn't only apply to moonstone abilities but also damage focussed models. Once again a model like Fritz can shine here with a carefully timed activation, activating last and slaying an opponents model with hordes of stones to win the game!
Defensive Models and Dealing Late Damage
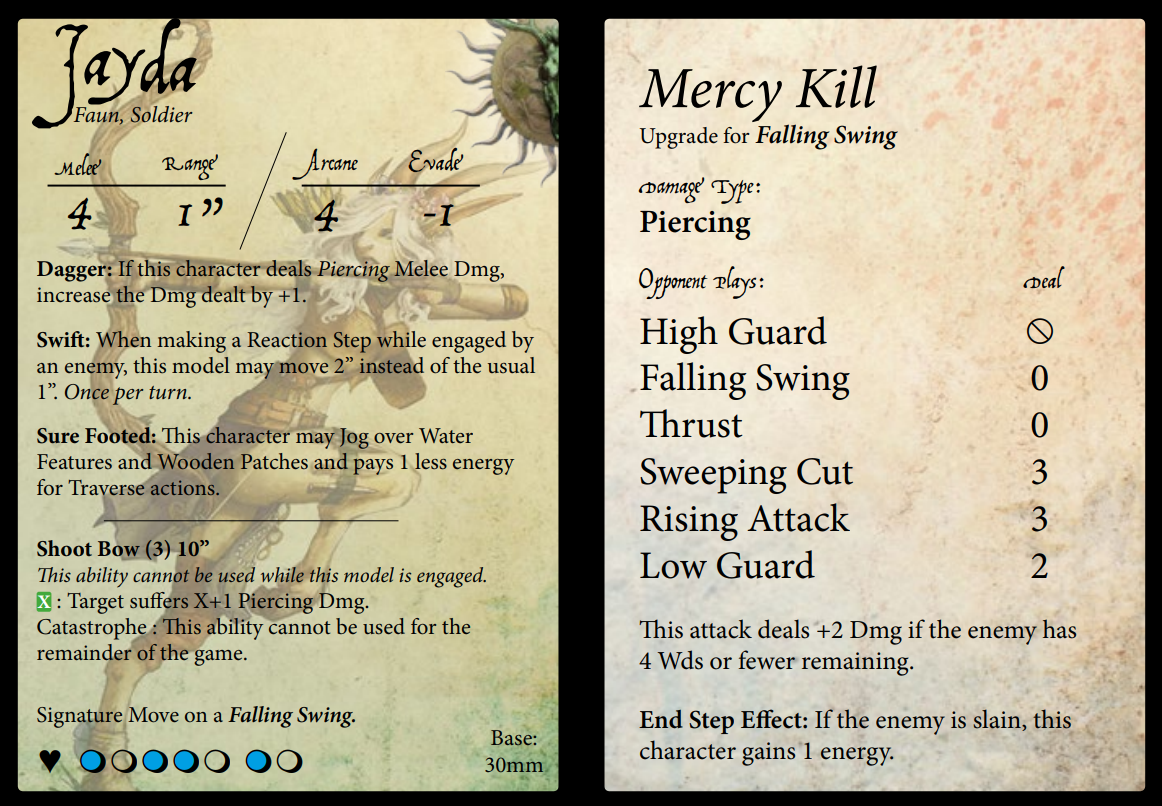
Jayda’s card.
In addition to considering when a model should activate, there are considerations for when models should avoid activating. Generally speaking, a model which hasn't been activated is more defensive. This is because they will still have their full allowance of energy for the turn which in turn allows them to take more reaction steps and make use of 'go for it' in melee. Some models also have additional defensive abilities which can only be used whilst they're not active, like Teetoe's 'Arcane reflection' or Jayda and her 'Swift'. A model which hasn't been activated also can, well... activate. An activation means a jog action, which can allow a model to get itself out of harm's way if needed. This is incredibly useful if a model like BoomBoom McBoom or Agatha is threatening to lure them as most of their work can be undone by a single jog action.
With this in mind, it is easier to deal damage the later it is in the turn than it is earlier in the turn. This is as more models have activated and there is less energy around for defensive abilities. Another way damage is affected by activation order is its interaction with healing. Due to how effective healing is in moonstone, healers are a common sight in every troupe and something which will have a big effect on the game. When a healer activates they can undo all the hard work put into damaging a model. Therefore, until all of a player's healers have activated, any damage that they have been dealt can be undone very quickly and therefore is less valuable. One way around this is by forcing your opponent's healer to activate earlier than they want to by dealing some damage to a character that needs to be healed. Alternatively, putting melee pressure on a healer can force it to activate early in order to jog away or spend all its energy to stay safe, not leaving any energy for healing.
By contrast, damage dealt at the end of the turn is incredibly valuable. This is due to a lack of available energy meaning models cannot take defensive reaction steps, 'go for it' or use any other reaction abilities. As well as just being generally easier to target they are also less likely to receive healing before the turn ends. Leaving a model wounded at the end of the turn can make them very easy to kill at the start of the next turn, especially useful if you have the initiative! As well as starting the turn with low wounds, a model badly wounded in the prior turn also starts with less energy. This can be incredibly useful against models with powerful abilities which use all their energy, such as Raegen, and can leave them potentially useless unless they receive healing. This in turn can make other models easier to damage next turn as your opponent will be focussed on healing the model which desperately needs healing!
Going in for the Kill
As just mentioned, badly wounding a model at the end of a turn can leave them very vulnerable to a first activation attack in the following turn. This can be an excellent tactic for killing models because it essentially allows you two back to back activations allowing you to put twice as much energy into dealing damage. It also allows the target very little space to react, attacking them at the end of a turn when they have little energy and the start of the next turn, wounded, with little energy. As having the first activation in a turn isn't guaranteed it's best to do this when you have bonuses to the roll-off. The main bonus to this roll-off is initiative but some models like Brother Daniel and the Duchess can also help here.
‘Double Activation’
As well as activating last one turn and then first the following turn there are other ways to simulate a "Double activation". The simplest way is by stacking loads of energy onto one model. Whilst this isn't directly affecting initiative or activation control you are essentially compressing multiple other models activations into one super-powered activation. The main advantage of this is taking a model like the Firespitter who will often deal a little damage which is then healed and giving him enough energy to 'Fireblast' three times destroying anything he fires at in a single activation! Having an activation like this can dissuade an opponent to use reaction steps, as you have enough energy to play around them, and most importantly denies healing as there won't be a model left around to heal! There are disadvantages to this though. Having one super-powered activation can leave the rest of your activations that turn less impactful. Additionally, if your opponent knows what you're doing and has the right abilities they can reduce your super-powered activation to nothing, 'Forgetfulness' is a particularly bad one for the Firespitter.
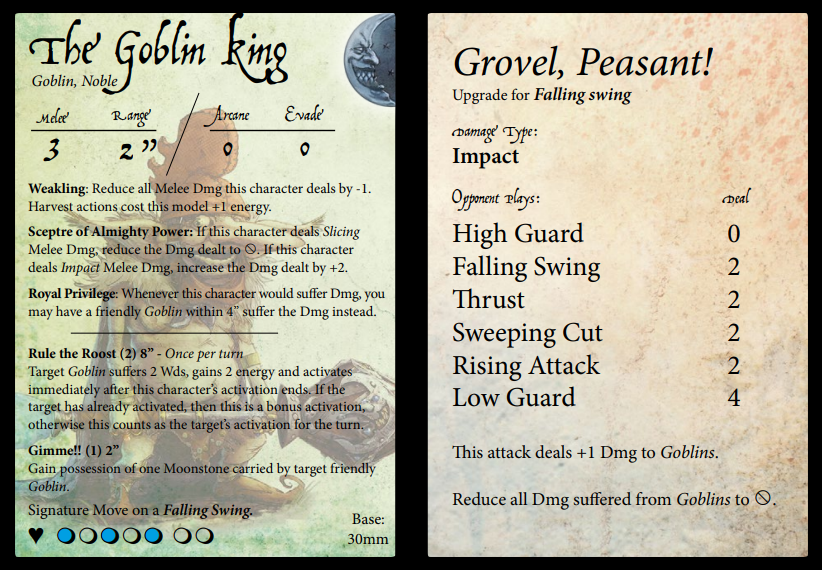
The Goblin King’s card.
One model which can donate energy to the Firespitter is the Goblin King with 'Rule the Roost'. As well as giving energy, this ability also allows the target model to immediately activate after him, another way to have a double activation. This is usually best used on a model which has already activated. Otherwise, if it targets a model that hasn't been activated yet you will essentially lose a future possible activation, increasing the chances your opponent gets the last activation. This can be circumnavigated by using this back to back activation to kill a model that hasn't activated thereby losing your opponent an activation and keeping that turns activations equal.
When using abilities like this which can lose you activations it is best to keep an eye on how many activations everyone has to avoid giving opponents an activation advantage. It's also therefore worth keeping an eye on abilities that can grant additional activations too, like Boris's 'Summon Jackalope' or the Mortician's 'reanimate' which brings back a model at 0 energy. Of course models with 0 energy are unlikely to use any abilities, but can still activate, potentially stalling and allowing another member of their troupe to activate last.
Conclusion
In summary, activation control can indirectly increase the damage and effectiveness of your models whilst simultaneously reducing your opponent's ability to counter them. It can also help offset their attempts to heal their troupe and can leave them energy-less and defence-less. Keeping in mind if your models have abilities that shine early or late in the turn can be a good way to decide if you activate first or second in a turn. They should then try their best to activate at the best possible time in the turn to maximise their impact, such as using debuffs on enemies early and healers healing late. If everything goes to plan your opponent should find themselves constantly on the back foot with wounded models that are hard to heal and weak activations that struggle to make an impact. Meanwhile, your models will always feel like they have enough energy, wounds and a damage output to match!